KISHAN THAKRAR
A LEVEL ART PHOTOGRAPHY PORTFOLIO
CGI Lantern Scene
THE ANIMATION PROCESS
FINAL OUTCOME

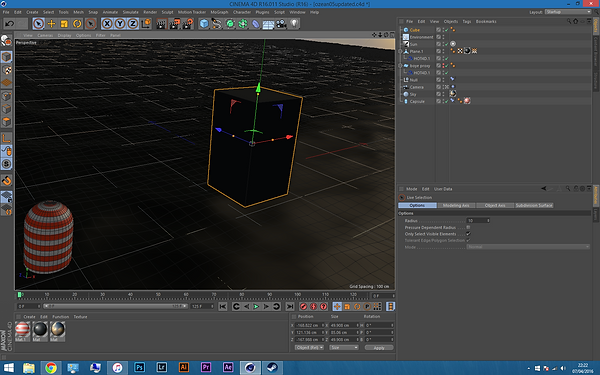

1. I set up a C4D scene, following my test piece. On the right, you can see I have placed a sky object, filled with a sky picture I took. Also placed is a square light to replicate the sun. I placed a capsule and applied a striped texture to it, to act as a buoy. I attached this using the Constraint tag to the surface of the water in order for it to float on the water. The water body was created with similar techniques previously described in the test piece write up. In short, it involved adding a large flat plane, displacing its surface for waves, and creating a material to look like sea water, with bump maps and reflection applied to it. This screenshot is in the 'Editor' environment, so it is worth noting that it does not look like the rendered outcome would. Instead it contains basic shading and lines around edges to help with editing the scene.
2. After finding inspiration from a scene from Tangled, I decided to incorporate floating lanterns into the scene, instead of the buoy being the subject. You can see on the left I have added a cuboid and I adjusted the length and width to fit the shape of a paper lantern. I stuck with a cuboid shape rather than a more complex spherical shape because this would be easier to animate and still a lot of lanterns I had seen on the internet were of cuboid shape. This then needed to be hollowed out, so I duplicated the shape, and scaled it down fractionally, applying the 'boole' tool to both objects, which subtracted the inside shape from the outside, leaving the inside of the cuboid hollow with some thickness on each side rather than it being a flat plane on each side.
3. With the lantern hollowed out, I wanted to add the light source, so I created a horizontal cylinder and placed it as shown, which would hold the flame source. I was careful not to let it poke through the sides and outside the lantern.


4. I added a candle object inside the lantern, placing it on the cylindrical stand I previously created. This object contained an animated flame and is luminous affecting primarily the area show on the diagram (marked with orange spherical lines). The item came from an object library for C4D. I adjusted the size and position of the candle and checked it from a distance.

5. Rendered scene so far. Compare to screenshot directly above of the same scene but not rendered; in editor mode.


6. Here I added a texture to the lantern. I created this from scratch. I needed the texture to be paper-like and to allow light through. I learned a new technique for this; sub-surface scattering. This allows light to come through without reducing opacity, essentially making the material translucent, which is useful for this situation and also when one wants to create plastics, that allow light through but retain a solid colour.
7. I rendered the scene on the right which shows the subsurface scattering turned on. You can see some light travels through the lantern shade, and the look is realistic.
8. I edited the luminance colour and rendered as shown on the left. This is like putting a colour filter on any light that is seen coming from the candle, and I gave this a warmer look by using a cream colour. The result can be seen in the rendered image behind the Material Editor.

9. I felt that the current Sky image was too light to let the lanterns stand out, so I temporarily placed a darker image found on the internet in the scene. The darker image is shown on the right. I would then take another picture myself to match the lighting of this new image.
10. Drawing inspiration from the scene from Tangled, I wanted to fill the scene with many lanterns, to create many reflections across the water. To create many, rather than individually copy and placing lots of lanterns, I used some techniques to make this quicker and more realistic. I used the Cloner tool, and changed the clone mode to clone in a grid arrangement rather than linear (as is currently in the image on the right). On the top right you can see the lantern object (which I grouped together) is now a 'child' of the Cloner object, allowing the cloner object to clone this object and not just any part of the scene.
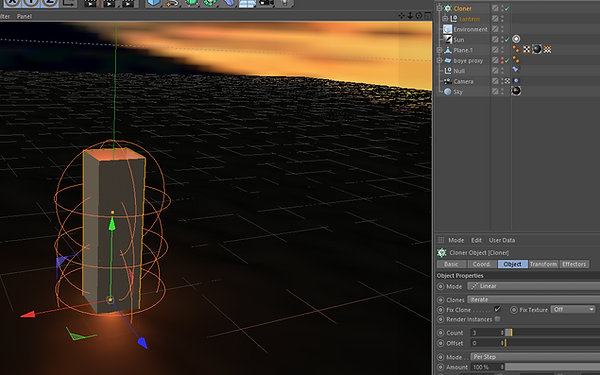


11. This shows the grid array with a count of 3 by 3 by 3 (x, y, z axis respectively). This means there are 3 clones in each direction across the grid. The form is 'cubic' which makes the cube shape shown. The one issue I faced was that the more lanterns, the longer it took to render due to each calculation of subsurface scattering and lighting for each candle, etc., so I kept the amount of lanterns minimum, but enough to fill the image, and also spaced them out for more depth over quantity.
12. The following three images show my progress in arranging the lanterns. The first image was when I raised the count of clones and the spread distance in the x-axis, thus choosing a width for the lantern dispersion area. The second image shows I have added spacing to the y-axis, which then gives a more desired spacing. The third image also adds more spacing in the z-axis, and I also increased the clone counts across all axes. I reduced the count slightly after the 3rd image because there were too many.

13. The images above also show the effect that the Randomize effector has on the clone tool. Essentially, it randomizes position, rotation and scale of the clones made by the cloner, because I needed the lanterns to be randomly scattered rather than uniformly arranged perfectly in the air. This is why the lanterns in the first image above are not in a perfectly straight line; the random effector randomly adjusts the positions slightly.
On the right you can see the random effector settings; I have ticked position scale and rotation, also choosing how much each are randomized. For example the range of randomization is greater in the z-axis for position, and for rotation each lantern is randomly rotated only horizontally, but could be any rotation out of the 360°.


14. Above shows the first frame and the last frame of the animation respectively. I wanted to animated the lanterns so that they are rising during the animation, gradually from just above the water level to higher up in the sky. I keyframed this animation as shown. I also keyframed animation to simultaneously space out the lanterns more in the y-axis as the animation continues, so that at first the lanterns are more flat across the water surface, and then they rise at different speeds, some higher than others, to fill the scene completely. This allowed for some really interesting and nice looking water reflections of the light.
15. Here the lanterns are more flat at the beginning of the animation.
16. Then at the end of the animation the lanterns are more spaced out, especially in the vertical y-axis.
17. Rendered scene so far. From this screenshot, I added atmosphere to separate the water from the sky, and add some interest. I also didn't like the Sky, it was still too bright, so I ended up removing the sky image and using the Physical Sky tool in Cinema 4D which creates a computer generated sky with adjustable clouds, sun, atmosphere and fog. I set the time of day to just after sunset, so there are stars and a dark sky, with a soft moon lighting the scene slightly. But this allowed the lanterns to really stand out.
18. Here the new background can be seen in this render, along with a slight atmosphere connecting the sea to the sky almost seamlessly. I was really happy with this look. The reflections looked very realistic and this was just one of the frames.
Here you can also notice the random horizontal rotation of the lanterns, which really gives each lantern a uniqueness.
I had given the camera a shaky, handheld movement to give the effect of floating on water.
19. The full render, unedited: