
KISHAN THAKRAR
A LEVEL ART PHOTOGRAPHY PORTFOLIO
CG Animation
Creating a Computer Generated Animation
I created an outline of the animation's plot, with annotations on techniques to acheive certain things. I will largely base the animation on this, however I may add/remove parts if required. I have found that as I go to shoot the videos or begin animating, I get more and more ideas.
Scene 4
For this scene, a pile of Lego bricks fall from the sky which provide an entrance for the scene's antagonist; a dragon. I plan to animate the dragon appearing from pieces of dust, which can be done in Cinema 4D, and then in After Effects I will add smoke and other effects. I want the environment to change almost immediately upon the dragon's appearance; this will be enhanced by adding music and then changing the colours slightly. I also need to try and balance the quality of the rendered 3D animation to match the background which will be lower resolution, due to the camera's 720p video recording limitation, which is still quite a good resolution.
Animation Process
I started off by opening a new Cinema 4D file.
I then wanted to create a group of bricks that would fall from the sky, so I placed a cube to represent a brick at first. I made this a child of a cloner object. Cloner objects quite literally clone anything put underneath them. You can change the parameters as to how the objects are cloned (quantity, size, shape). I also added a dynamics tag which applies physics to the cube, so that it is affected by gravity and can collide with other objects.


I edited the dynamics tag with these settings so that the bricks would realistically fall to the ground without sliding too much on the floor.The tag is also vital for the bricks to fall from the sky.
I added some lights to the environment:
I then positioned them so that one was at the centre of where the bricks would fall to, and another from above.
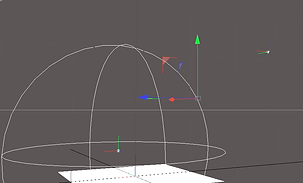

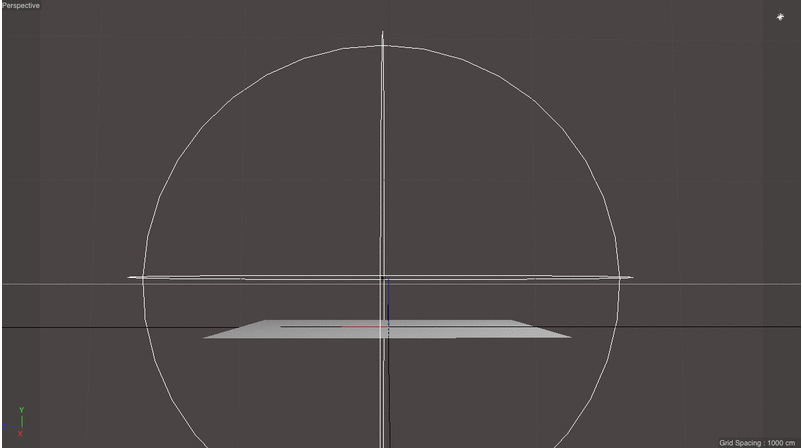
To this, I added a Camera, Environment (soft/weak layer of fog), a Sky and a Floor. I made the sky black for now, and the floor a semi-reflective white.

I replaced the cube with a lego brick I modeled from putting together a cuboid with smaller cylinders. I arranged the bricks in a 3D grid arrangement as seen in the screenshot and I placed them high above the ground.
I experimented with rendering different amounts of bricks, and found an amount that would render fast, but still being a sufficient number to fill the screen enough.
At this point everything is looking very dull and grayscale, so I created a lego brick texture from scratch. I had never done this before, so I looked at some close up images of lego bricks, and noted specific characteristics. I knew that some features of the plastic material, e.g. sub-surface scattering would take too long to render on a small computer (in relation to computers used by animation studios), but I experimented with the different settings and I was happy with the outcome. I was inspired by the lego movie as that was computer animated, and in a behind-the-scenes video an animator comments on how they even make the bricks look scratched and worn to give a realistic feel; I attempted to recreate this also.


I used green to begin with, but this is the variable that will be changed for different bricks. I also added some environment and reflectance. The bump layer can be seen below; it is a greyscale image of scratches, which is applied to the texture, and so where it is darker, it cuts deeper into the texture.
The reflectance was built up of two layers; the default specular layer and then a layer I added, and I set it to 27%; 100% being as reflective as a mirror, and 0% being not reflective at all.
I tried to get the colours to match as closely to the real lego brick colours as possible, using real bricks and images online as references.
Here is a rendered preview of the finished texture I made. I was pleased with the effect, and the bump map really worked well to give a scratched and worn effect. This is applied onto a spherical object for preview purposes.


I then applied the texture to the bricks, however I soon noticed all the bricks were the same colour and I wanted to make them different colours, so I duplicated the texture I had made, and changed the colour parameter on each one. I then applied all the textures to the brick that was cloned, however the bricks stayed green as that was the first texture applied to them. I then made copies of all the cubes and applied the textures separately (as seen below), and it worked.
I then rendered out the scene so far, to see if the lighting was okay and if the bricks looked real. I rendered to 1080p which was probably too high a resolution for a preview, and it took almost an hour to render a few seconds worth of frames, at 25 frames per second, so the end of this video stops quite abruptly. That said, I was pleased with the outcome as the bricks were as I imagined they would be, and there were no issues at this stage.
Alternatively, this stop-motion animation of screenshots sums up the scene so far (not rendered).

I adjusted the position of the camera so that it was in the best position to capture everything that occurs, but not too far away.
The next part of the scene is when the dragon appears. I wanted a dramatic entrance, and to show the dragon's authority and power, I decided push the lego bricks out of the way, and have the dragon appear as if from dust. Firstly, to push the lego bricks out of the way, I got a capsule object.


I keyframed it to move upwards from beneath the floor and added a dynamic collision tag so that it would move the bricks as it travelled upwards, rather than just pass through them.
These videos show how I did this:
The first time, you can see the capsule object travel upwards; the second time, I turned on the bricks so that you can see its effect.
You can also see the camera's position.
This time, I hid the capsule so it was there, but not seen, because it is meant to be a metaphysical force that moves the bricks.


For the dragon's entrance, I wanted it to appear out of dust, and so I used the shatter effector, which splits the polygon up into lots of little pieces, depending on the strength of the effector. Therefore this can be used as a transition when the strength of it is keyframed.
I made the shatter effector a 'child' of the dragon, so it knows what to shatter, and then I keyframed the strength to make the transition.
The transition. Rendered below with texture.
Lighting
Texturing the bricks
Camera Position
The Dragon
Texturing the dragon
For the dragon's skin I wanted something partly realistic, but obviously something expected of a child's imagination; to save time, I used an pre-made texture online as a base for my texture.


The screenshot below shows the settings for the light in the centre. I put a noise filter on it to make the light slightly textured and less obtrusive; I selected the 'Soft Turbulence' preset, the alpha mask shown below, and the effect can be seen later on.
Here is a preview render of the final texture for the dragon, very close up:
The default specular brings out the texture of it, especially on the highlight where the light reflects most.
The main feature of this texture is the bump map, which is just a preset in the noise texture category, as shown on the left. As before, the darker parts cut deeper and the lighter parts are further out when applied to an object. Also the colour is not just one colour, but a gradient from orange to light orange/yellow. A fresnel gradient looked best as it was a smooth curved gradient that looked good.
Lastly, a render of the dragon with the texture on in high resolution. The texture does look very different from further away than it does closer up, but the reflections of the dragon's feet on its neck work really well, and the bump map also adds detail to what could be a very uninteresting object, as it was when it was textureless and gray.


Animating the dragon
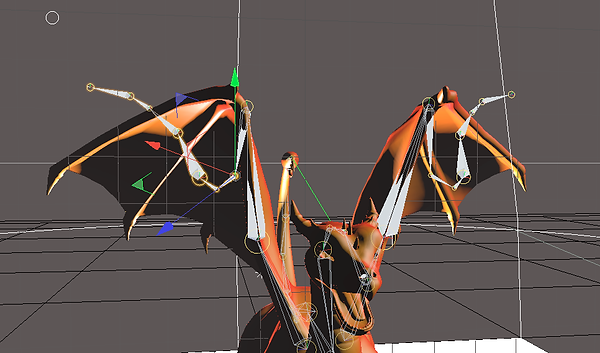
This part was definately the most tedious part, involving numerous computer crashes and several headaches. I also learned the most from this process. Gone are the days of rigid unrealistic movements, as I also discovered dynamics, which opened several doors when it came to getting as good quality animation as Andrew McMurray's. I began by rigging the model (literally giving it bones and muscles for the computer to use in its elaborate
calculations):
I began by using the Joint Tool to put in joints at points in the body. I searched the internet for ways to do this and most led me to start with the spine. I made points along the spine, from head to tail, carefully adjusting each points position.
Once finished, this is what the spine looked like, without the dragon's body. Later on each joint will be binded with the dragon's body to allow it to move parts of the dragon when I move the joints.
To the left, is the hierarchy shown of each joint. The root being the head, and Joint.16 being the end of the tail. Below is a side view of the dragon as above, but with the model shown also.
I then added a new 'Root' joint for the wings. I discovered a symmetry feature which allowed me to place joints for one wing and it was then mirrored onto the other side, which saved me time. I then adjusted the points that needed correcting.
On the left is the finished rigged wings. The green lines show the direction of the Y-axis on each point, where there are also blue and red lines (indicating Z and X axes respectively) of all the joints in the right wing.
I also repeated this process for the two front legs, giving me even more joints I could use to animate. I then created an IK character tag for each set of joints (e.g. left wing, right wing, spine, etc.) so that I could indicate where each line of joints ended (e.g. spine went from head to tail). This would affect the dynamics of the object later on (the way it moves).
This is what I did on each IK tag - I indicated where the joint group (technically called an IK chain) ends.


I then went to move a joint, but the dragon itself was not affected by this movement, and therefore the joints had no effect on the dragon, they were still completely separate items.
I then went to move a joint, but the dragon itself was not affected by this movement, and therefore the joints had no effect on the dragon, they were still completely separate items. I decided to temporarily hide the layers of joints I had just made, and I discovered a Character tool. I searched the internet to see what it was, and it seemed to be a more automated and easier way to do what I had previously done.
It provided the options to choose types of animals, and had presets for wings, tails, heads, necks, etc. and I was able to map out the joints more easily than before. However when it came to attaching it to the dragon object itself I ran into the same issue.
The joints shown from using the Character tool.
A lot of trial and error was involved, but eventually a Youtube tutorial showed me that I needed to use the bind tool, so I went back to my original set of joints and deleted this new one. I selected all the original joints and also selected the dragon object, and clicked Character > Commands > Bind.
This worked, and when I moved the joints, it would move the dragon's body with it. Then after endless keyframing of movements I was able to animate the dragon moving:


I then animated the dragon exiting by flying away and out of the shot. This took some experimenting, especially getting the right movements of the wings, and even the result was not perfect, but the wings moved so it did the job. It would be easier if the wings were smaller perhaps.
Below is a timeline showing all of the keyframes that I added for the dragon's movements just before he flies away. You can see which parts of the dragon move at which points.


Chroma Key Setup
At this point, the animating was more or less finished for this scene. It had grown from around 180 frames to 520 frames; a vast increase in render times.
Nevertheless, I needed to superimpose the animation onto another video background. There are numerous ways of doing so, however my most familiar way that has worked previously was to just make a green screen background. Later on in After Effects, this would be easier to just use a Chroma Key plugin to remove anything that was a certain colour, in this case, green.
You may notice from the screenshots earlier on, one of the brick colours is green. As I did not want the computer to interpret the green bricks as part of the background, I changed these to orange bricks. To get the green background I just changed the colour of the sky which was originally black, to a green colour.
Notice, however, the green reflections in some bricks and on the dragon. This was because they had just been instructed to reflect any light they can see. To counteract this, I added a compositing tag to the sky and essentially told the sky not to be seen by reflections and I removed all its powers apart from its green colour. Therefore it could not cast/receive shadows, or affect reflection, rays, or refraction amongst the objects on the ground.
Also notice that the ground is still white. I applied a compositing tag to this and made it invisible to the camera, but still physically there for the bricks and objects to land/sit on.
The Dragon's Escape
This scene is the first scene on the storyboard. I actually started working on the lego bricks scene first, which influenced the appearance of the dragon. I began by recording a video of the actor sitting at a desk, colouring. Behind the desk is a shelf from which the dragon escapes. Here is the raw footage:
I then went to Cinema 4D to animate the dragon. I copied the model of the dragon from the previous file. As the shot was a tripod shot, without any pan, I did not need to track the camera movements necessarily, however I found that there were slight movements as the tripod was on a rug, and although this was unnoticable, I decided to track the camera movements also.


I placed the dragon in the environment.
The background was the video file pictured below.
I adjusted the position of the dragon to fit on the shelf.
I animated the general movement of the dragon, the 'flight path' is shown by the thin blue line across the image. It starts by falling off the shelf directly downwards, and then flies upwards and out of shot. It disappears behind the chair and actor, so this would need keying out with a mask in post production.
I removed the default specular and just kept the colour for the background. This was only for reference purposes, as I would be exporting this with a green background to later chroma key out in post.


I added the green background that I would use in the final render of this scene. It was a plane, with a solid green texture applied to it.
A preview of its appearance and positioning.


Because the background footage had a blurred background, I needed to match the animation's camera focus to properly composite the dragon into the background. I added a camera to the environment and turned on Depth of Field. I then adjusted the front and rear blur settings and blur strength amounts to suit the background.
Render with Depth of Field. The blur would only apply to the dragon as the green background would be used in the final render
Lighting
Background Setup
Depth of Field
I added a light to match the light source in the background footage, which came from a window. This light would be quite diffused but would have a high intensity.


I keyframed the light so that it moves closer to the object during the animation, because in terms of shadows, after it falls and flies off, the shelf stops and there is a wall, which is further back, so a bigger shadow would give the illusion of the wall being further back, when actually it is a flat green screen on the animation.
I rendered out this scene and opened it in After Effects.

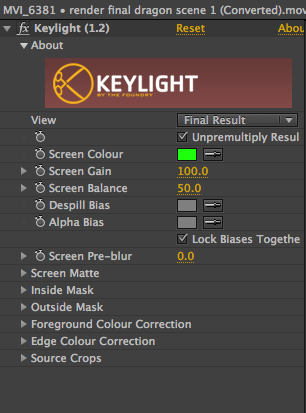


I placed the render and the background footage in a new composition in After Effects. I then used Keylight to key out the green background. I used the Colour Picker tool to select the shade of green on the render footage, which removed the green and I obtained the result below:
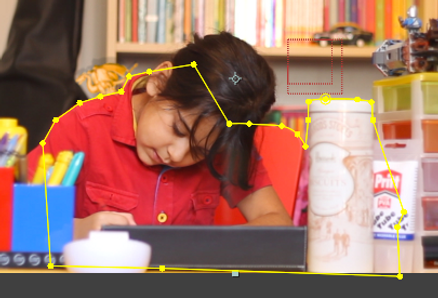
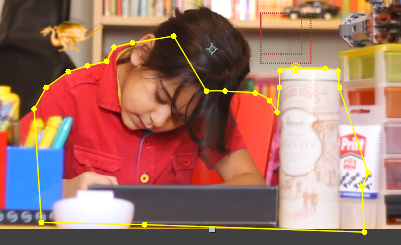
I then used the Pen Tool to create a mask that would prevent the dragon from being seen when it is supposed to fall behind the chair.
I finished drawing the mask, for when the dragon flies off towards the end of this scene. I feathered the mask by a fraction so that it would seem more realistic.
I noticed that there were slight movements in the camera, and so the dragon moved with the scene, whilst the camera movements occurred, isolating the dragon from the background momentarily, which impacted on the realism of the dragon. To mitigate this I 3D Camera Tracked the background footage, returning a set of points that had been tracked.
I right-clicked on it and created a Null object, which is invisible in the final outcome, but is useful for purposes like attaching images/videos to tracked points. The null object was also useful in that I could not attach the dragon to the track point directly, as it was a 3D track but the dragon was a 2D video file. I found that the best way of attaching it was using the null object as a 'translator' for the 2D video file to communicate with the 3D tracked point.
I selected one that was at the spot where the dragon was sitting, so that the dragon would 'attach' onto the movments of this point on the background footage.
I typed in an expression that allows the null to anchor to the track point, and then I made the dragon video a child of the null.
I repeated this for footage taken at another angle so that I could have two angles to use to add interest to the scene, as many of the animations I had studied featured more than one fixed angle. The finished scene can be seen below:
Dragon's Escape Continued - Scene 2
In this scene, the dragon flies out of the room and down the stairs. For the animated part, I just animated it flying from the room and down the stairs. In the final edit, I also added a P.O.V. shot of the dragon going down the stairs, but this needed no animation. The actress also features in this scene, chasing after it, however she is not seen in the same shot as the dragon in this scene, so this scene really comes together in the final edit.


I loaded the model into a new project in Cinema 4D.
I then loaded the background footage into a material on the background for reference.
I placed the dragon where I wanted it to begin flying. I'd mask this out in After Effects later, so that it appears to start flying behind the wall.
I animated it's path first, without any rotation or movements of body parts, as shown in the video (<--).
I then added rotations and movements after obtaining the basic path. I used techniques previously explained. I also adjusted the path slightly, to fit the movements.
As before, I placed green surfaces in to provide the green screen, and set their compositing tags to catch shadows coming from the dragon.
Rendering it out in Cinema 4D. I enabled Depth of Field to match the bacgkround footage.
I then opened the animation into a new composition in After Effects (below) and applied different effects (right), including a motion blur, noise, and colour correction to match the background footage.
I used Keylight to mask out the green (left).
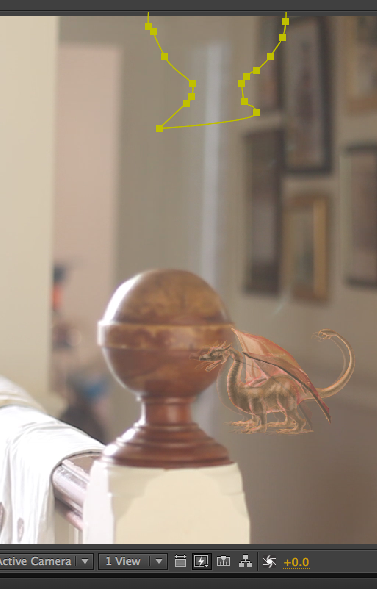
I drew a mask on the video with the Pen Tool, and feathered it slightly so that the dragon could fly behind the banister first, and then I keyframed the mask to move so that it appears to fly in front of the banister.
The finished scene, rendered:
Scene 3
I screen recorded myself animating and editing this scene. It features similar techniques to those used previously, and instead of uploading its original length of 1.5 hours, I increased the speed, producing this speed art:
After many hours of work and rendering, with the addition of non-animated footage, the finished video, edited in Adobe Premiere Pro: